오늘은 코틀린으로 파이어베이스랑 이메일 로그인 연동을 해보겠습니다.
상단의 tools의 파이어베이스를 클릭한 후 Authentication으로 이동해줍니다.
그 후 1번을 클릭한 후 구글로그인을 해주고 절차에 따라줍니다.
파이어베이스 창이 뜨면 프로젝트 이름을 입력해주고 Connect to Firebase를 입력해줍니다.
로그인 화면에 연결할 새로운 액티비티를 만들어 줍니다.
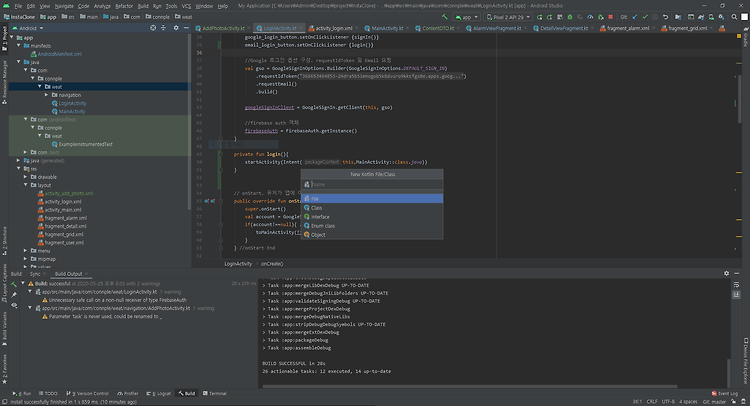
먼저 안드로이드 스튜디오 우측의 weat폴더 우클릭 -> new -> Kotlin File/Class 를 클릭해줍니다.

네임에 LoginActivity라 적어줍니다.
액티비티를 생성한 후 상단의 manifests를 클릭하고 AndoridManifest.xml을 열어줍니다.
<activity android:name="com.connple.weat.LoginActivity">
            <intent-filter>
                <action android:name="android.intent.action.MAIN" />

                <category android:name="android.intent.category.LAUNCHER" />
            </intent-filter>
</activity><activity> android:name="com.myapp.myapp> </activity>를 새로 입력해주시고(myapp에는 자신이 입력한 패키지 명이 들어가야 됩니다.)
위와 같이 <intent-filter>안의 내용을 LoginActivity의 <activity> 안에 넣어줍니다.
이제 LoginActivity로 이동해서 아래 소스를 입력해줍니다.
import kotlinx.andorid.synthetic.main.activity_login.*

class LoginActivity : AppCompatActivity(),View.OnClickListener {
override fun onCreate(savedInstanceState: Bundle?) {
        super.onCreate(savedInstanceState)
        setContentView(R.layout.activity_login)
        auth= FirebaseAuth.getInstance()
        // 이메일 로그인 함수 실행
        btn_email_login.setOnClickListener {signInAndSignUp()}
	}

    fun signInAndSignUp(){
		auth?.createUserWithEmailAndPassword(email_edittext.text.toString(),password_edittext.ext.toString())
        	?.addOnCompleteListener {
            task ->
            	if(task.isSuccessful){
					//유저 계정 생성
                    moveMainPage(task.result.user)
                }
                else if(task.exception?.message.isNullOrEmpty()){
                	//에러 메세지 생성
                    Toast.makeText(this,task.exception?.message,Toast.LENGTH_LONG).show()
                }else{
                	signinEmail()
                }
    }
    fun signinEmail(){
    	auth?.signInWithWithEmailAndPassword(email_edittext.text.toString(),password_edittext.text.toString())
        	?.addOnCompleteListener {
            task ->
            	if(task.isSuccessful){
					//유저 계정 생성
                    moveMainPage(task.result.user)
                }
                else {
                	Toast.makeText(this,task.exception?.message,Toast.LENGTH_LOGN).show()
                }
    		}
    fun moveMainPage(user:FirebaseUser?){
       	if(user != null){
           	startActiviy(Itent(this,MainActivity::class.java))
        }
    }
}Alt + Enter를 이용하시면 임포트가 안된 빨간줄이 그어져 있는 패키지들을 자동으로 임포트 해줍니다.
이제 기존 로그인 액티비티의 EditText에 id를 추가해줍니다.
<?xml version="1.0" encoding="utf-8"?>
<RelativeLayout xmlns:android="http://schemas.android.com/apk/res/android"
    xmlns:tools="http://schemas.android.com/tools"
    android:layout_width="match_parent"
    android:layout_height="match_parent"
    tools:context=".MainActivity">


    <LinearLayout
        android:layout_width="match_parent"
        android:layout_height="wrap_content"
        android:orientation="vertical">

        <TextView
            android:layout_width="match_parent"
            android:layout_height="80sp"
            android:text="로그인 화면입니다."
            android:textAlignment="center"
            android:textSize="20sp" />

        <EditText

            android:id="@+id/email_edittext"

            android:layout_width="match_parent"
            android:layout_height="wrap_content"
            android:hint="id" />

        <EditText

            android:id="@+id/password_edittext"

            android:layout_width="match_parent"
            android:layout_height="wrap_content"
            android:hint="pawword" />

        <Button
        	android:id="@+id/btn_email_login"
            android:layout_width="match_parent"
            android:layout_height="50sp"
            android:text="로그인"/>

    </LinearLayout>
</RelativeLayout>이제 구글에 파이어베이스를 검색, 로그인 한 후 콘솔로 이동해서 Authentication을 클릭해줍니다.
Sign-in method를 클릭한 후 이메일/비밀번호 옵션을 활성화 해줍니다.
이제 이메일로 로그인, 회원가입이 가능해집니다!
'Language > Kotlin' 카테고리의 다른 글
| 코틀린에서 API KeyHash 생성하는 함수 (0) | 2020.07.13 |
|---|---|
| [안드로이드]CLEARTEXT communication to XXXX not permitted by network security policy 에러 해결 방법 (0) | 2020.07.09 |
| [코틀린으로 인스타그램 만들기] 1. 로그인 화면 만들기 (0) | 2020.05.24 |
| 하울의 인스타그램 만들기(코틀린) (0) | 2020.04.29 |
| Android 개발을 수주해서 Kotlin을 제대로 써봤더니 최고였다.[펌] (0) | 2020.04.28 |
